The other day, I was searching for information on wooden cladding. I just needed basic information—what types are there, what do I need? It was the usual stuff that someone in that industry no doubt knows inside and out. It occurred to me that when you’re in a specific industry, you sometimes take the terms for granted. You assume people will know what is available or what product goes with what.
I wanted to help with that in my industry, the bathroom and plumbing game. I want to help you know your unslotted from your slotted and your overflow filler from your mono mixer. This quick and easy guide will hopefully help.
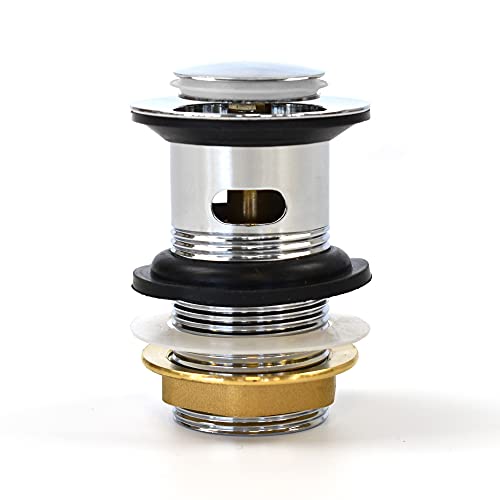
Basin Wastes: Slotted or Unslotted?
When choosing your basin waste, you will see slotted and unslotted options. What you need depends on if your basin has an overflow. Some basins have an overflow, a small hole to prevent water from spilling. Other styles of basins have no overflow.
Deciding what you need is simple. If your basin has an overflow, you need a slotted waste. If you have no overflow, you need an unslotted waste. You can remember it easily: overflow slot = waste slot, no overflow slot = no waste slot.
To make life even easier, you can now get a ‘universal’ waste. This is a clever design that can be adapted to work with both types of basin. It means you don’t have to worry about getting it wrong – it’s a great fallback if you’re unsure what your basin requires.


Basin Taps: Mono Mixers vs. 2 or 3-Hole Taps
Sticking with basins, you have options for taps like the mono mixer or designs needing two or three tap holes.
A mono mixer uses a single handle to control both hot and cold water from one spout. Your basin only needs one tap hole for this style, which offers a clean, modern look.
You could also choose a 2 or 3-hole tap. A 2-hole basin has separate taps for hot and cold. A 3-hole setup adds a separate central spout alongside the individual hot and cold taps. These taps tend to create a more traditional style. The tap style you choose must match the number of holes in your basin.


Bath Taps and the Clever Overflow Filler
This same logic of 1, 2, or 3-hole taps applies to your bath. You can have traditional separate pillar taps, a mixer that sits on the rim of the bath, or a multi-hole setup. But with baths, there is another option to consider: an overflow filler.
This is one of those clever bits of kit that keeps your bath looking sleek and minimalist. An overflow filler combines three jobs into one unit. It acts as the overflow, it houses the waste plug, and it’s also the very thing that fills your bath with water. This means you don’t need any visible taps on the bath itself, creating a really clean, uncluttered finish.
So how do you control the water? You can choose from a couple of valve options. While you can mount them on the wall, a more popular option is to have them deck mounted on the rim of the bath itself. From there, you could have a mono mixer valve, which uses a single lever to mix hot and cold water to the perfect temperature before sending it to the overflow filler. Or, you could have separate controls for the hot and cold feeds, giving you precise, independent control over the temperature. It’s a smart way to get both function and style.

- Consists of: bath tub trap, basic set, finish set
- TÜV certified
- Suitable for standard bath tubs, with bellows for bath tubs with slanted bath rim

Left-Hand vs. Right-Hand Baths
Next, you might see a bath described as ‘left-handed’ or ‘right-handed’. This term almost always applies to L-shaped or P-shaped shower baths, the ones designed with a wider end for a roomy shower. The ‘handing’ is just a simple way to describe which end the wider section is on, so you can fit it perfectly into your room.
The easiest way to get your head around it is to think about the corner your bath will sit in. Stand back and look at the main wall your bath will be against. If the bath needs to fit into the left-hand corner of the room, you need a left-hand model. If it’s going into the right-hand corner, you need a right-hand one. The name literally tells you which corner it’s built for.
There’s no better or worse option; the choice is dictated entirely by your bathroom’s layout. Consider where your door is, where the toilet and basin will be, and which orientation makes the most practical use of your space.

- Elegant Curved Design: This elegant round bath tub features smooth curves and a crisp white finish, bringing soft, conte…
- Durable & Lightweight Acrylic: Built from high-quality acrylic, this bathtub offers excellent strength, heat retention, …
- Gloss White Finish: The bright white gloss shower bath surface not only adds a clean, polished feel to your bathroom but…
Shower Valves: Concealed vs. Exposed
Finally, let’s move on to the shower. Here you’ll mainly hear two terms: concealed and exposed valves. Luckily, this is as simple as it sounds. The name tells you everything you need to know about how they are installed.
An exposed shower valve is a bar that is fixed onto the tiles or wall of your shower. All the workings are in that bar, and it’s completely visible. It’s often easier to install, particularly in a renovation.
A concealed valve, as you’d guess, hides the bulky parts of the valve and the pipework behind the wall. All you see on the outside is a neat control plate with the handles or levers. This gives you a very clean, minimalist look but requires the space to be built into the wall.


So there you have it—a few of the most common bits of jargon in the bathroom world decoded. I hope this guide helps you feel more confident in your choices and pick out the perfect kit for your project.